Key Benefits of This Recipe
- Gluten-Free and Vegan Friendly: This recipe is perfect for those with gluten or dairy intolerances, as it uses a combination of rice flour, potato starch, and psyllium husk to create the perfect doughnut without the need for traditional flour or eggs.
- Healthier Alternative: With the use of flaxseed, psyllium husk, and apple cider vinegar, this doughnut is enriched with fiber, healthy fats, and digestive benefits while reducing the need for heavy processed ingredients like yeast.
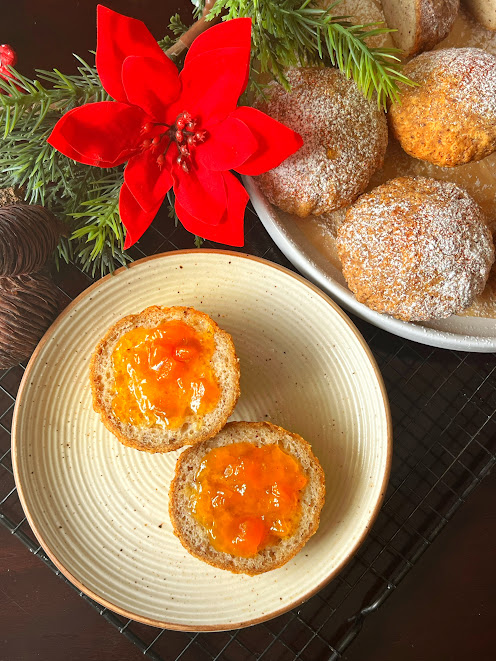
- Customizable and Versatile: You can enjoy the doughnuts rolled in cinnamon sugar for a classic touch or add your favorite jam for a fruity, indulgent variation, allowing for personalization based on your taste preferences.
Ingredients:
Flax Seed Powder: 15g + Warm Water: 6 tbsp
Psyllium Husk: 10gms + Water: 140gms
Brown Rice: 130gms
Potato Starch: 85gms
Tapioca Flour: 40gms
Sugar: 35gms
Xanthan Gum: ½ tsp
Baking Powder: 1 tbsp
Baking Soda: 1 tsp
Cinnamon Powder: 1 tsp
Nutmeg: 1/4th tsp
Oil: 35gms
Apple Cider Vinegar: 6 tbsp
Water: 140gms
Optional Topping:
For Rolling: Mix 100g Superfine Sugar + ½ tbsp Ground Cinnamon
Jam (optional): Any jam of your choice
Notes:
Please note that Weights (in grams) are often more precise for baking.
Method:
- Mix the flaxseed powder with warm water and let it sit for 10 minutes.
- In another bowl, mix psyllium husk with cold water. A gel will form after 30-45 seconds.
- Sift together the dry ingredients: brown rice flour, potato starch, tapioca flour, sugar, xanthan gum, baking powder, baking soda, cinnamon powder, and nutmeg.
- Whisk the flaxseed mixture for 5 minutes until thickened.
- Add the flaxseed gel, psyllium gel, oil, apple cider vinegar, and water (140g) to the dry ingredients.
- Mix everything well using your hands.
- Knead the dough for about 10 minutes until smooth and well-combined.
- The dough will be soft. Cover the bowl with cling wrap and let it rest for 30 minutes.
- Divide the dough into 8 equal pieces, about 90g each.
- Roll each piece into a smooth ball using your hands.
- Gently flatten each ball to about 1 inch thick and 3 inches wide.
- Place the doughnuts on a baking sheet and cover with cling wrap for 30 minutes.
- Heat oil in a deep pan to 320-330ºF (160-165ºC). Maintain this temperature while frying.
- Fry two doughnuts at a time, flipping them gently with a spoon. Fry for 8-10 minutes until golden brown.
- Drain the doughnuts on paper towels.
- While still warm, roll the doughnuts in cinnamon sugar for a delicious finish.
- Alternately, you can also slice the doughnuts in half and spread your favorite jam on each side.
- Enjoy your Gluten free, Vegan & Non-Yeasted Doughnuts!!
Shelf Life:
- At Room Temperature: Best consumed within 1-2 days when stored in an airtight container.
- In the Refrigerator: Can last up to 4-5 days if properly stored in an airtight container.
- In the Freezer: Doughnuts can be frozen for up to 1 month. Reheat in the oven or microwave before serving.
For best texture and flavor, it’s recommended to enjoy them fresh.
Storage Tips:
- Room Temperature: Store doughnuts in an airtight container lined with paper towels to absorb moisture. Consume within 1-2 days.
- Refrigerator: Place doughnuts in a sealed container. For best freshness, consume within 4-5 days.
- Freezer: Wrap each doughnut individually in plastic wrap or foil, then place them in a freezer-safe bag. They can be frozen for up to 1 month. Reheat in the oven or microwave before serving.
Make sure to avoid stacking doughnuts to prevent them from becoming soggy or misshapen.
For the best experience, enjoy it fresh. Let’s continue this delightful gluten-free baking journey together!
Remember to tag me and share your mouth-watering creations! Your photos and experiences are not just culinary delights but an inspiration to me! Feel free to reach out via DM to share your thoughts and experiences with this recipe. Let’s continue making gluten-free baking a joyous and flavourful journey together!
Click here to watch the simple, step-by-step video tutorial.
Embark on a transformative gluten-free journey with our Online Gluten-Free Bread Class! Clicking on the link opens the door to a world of gluten-free and egg-free magic and delightful learning. For our gluten-sensitive readers, this is not just a class; it’s a gateway to:
- Expert Guidance: Access step-by-step video tutorials led by seasoned experts, ensuring a thorough understanding of gluten-free bread making.
- Tailored for You: Learn techniques specifically crafted for those sensitive to gluten, ensuring a safe and enjoyable baking experience.
- Delicious Results: Master the art of creating gluten-free bread that’s not just dietary-compliant but also delicious, so you never have to compromise on taste.
- Community Connection: Join a community of like-minded individuals, sharing experiences and tips, making the learning journey interactive and supportive.
- Fun and Enjoyment: Baking should be fun! Experience the joy of creating mouthwatering gluten-free bread, adding a delightful touch to your culinary repertoire.
Don’t miss out on this opportunity to turn your kitchen into a gluten-free haven – click the link and let the egg-free magic unfold!
Join our Incredible Online (Paid) Gluten-Free Bread Class with Video Tutorials – Where the Egg-Free Magic Awaits! Don’t Miss Out on the Fun!
https://cookeryexpressions.co.in/gluten-free-breads-no-maida-no-atta-eggfree/
✨ Click here to watch the simple, step-by-step video tutorial for the Gluten-Free Grain Harmony Loaf and other amazing gluten-free bakes. Let’s bake up some joy together!
https://www.facebook.com/groups/glutenfreebakingmasterycommunity/