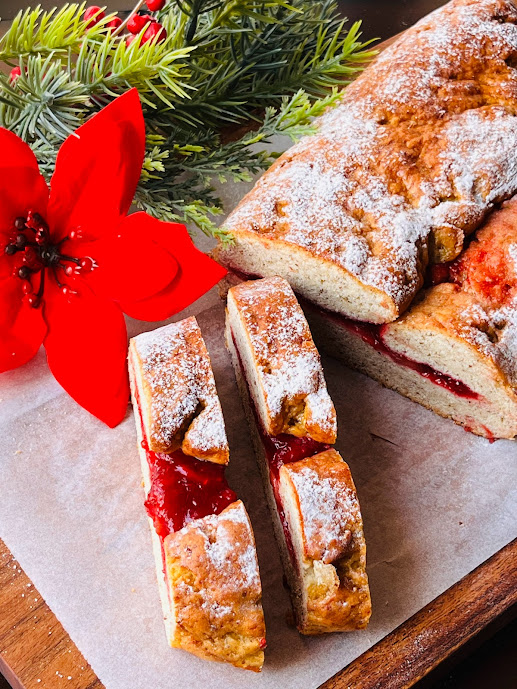
Gluten-Free Bliss: Enjoy a delightful, fruity pastry that’s soft, easy to bake, and nutrient-packed for a wholesome treat! These gluten-free yeast pastries are a delightful surprise—they have a cake-like texture that defies expectations. I’ve used my gluten-free baking skills to make them light and delicate.
Raspberry Filling
Ingredients:
White Rice Flour: 8g
Warm Water: 80g
Raspberry Preserve: 250g
Diced Apples: 1 cup
Method:
- Mix White Rice Flour with Warm Water in a bowl and set aside.
- On low heat, in a frying pan, combine Raspberry Preserve and Diced Apples. Cook until apples are soft.
- Add the rice water mixture and cook until the filling thickens – 3 to 4 mins.
- Remove from heat and let it cool for 3 hours.
Egg Wash
Whisk 1 Egg + 1 Tbsp Milk. Set aside.
Yeast Mix
Ingredients:
Warm Water (microwave for 30 secs): 110g
Powdered Sugar: 20g; Instant Dry Yeast: 10g
Method:
- Dissolve powdered sugar in warm water in a bowl.
- Add Instant Dry Yeast and stir for a few seconds.
- Let it stand for 10-15 minutes until bubbles appear.
(I generally preheat my oven to 100C and switch it off. Then place the bowl of yeast inside and cover it with a bigger bowl. This method results in good rise of the yeast!!)
Raspberry Pastry
Ingredients:
White Rice Flour: 100g
Sorghum (Jowar) Flour: 200g
Tapioca Starch: 100g
Flaxseed Flour: 20g
Powdered Sugar: 30g
Pink Salt: 6g
Xanthan Gum: 6g
Full-Fat Sour Cream @ Room Temperature: 125g
Eggs @ Room Temperature: 2
Notes
Please note that Weights (in grams) are often more precise for baking.

Method:
- Prepare a baking tray with parchment paper.
- Dry-Mix: In a large bowl, sift White Rice Flour, Sorghum Flour, Tapioca Starch, Flaxseed Flour, Pink Salt, and Xanthan Gum.
- Egg-Mix: In a separate bowl, place sour cream, eggs, and powdered sugar. Whisk for 2 mins, using a wire whisk.
- To the Dry-Mix, add the fermented Yeast Mix and Egg Mix. Mix with hands until a soft dough forms – 4 to 5 mins.
- Dust the working surface with White Rice Flour. Shape the dough into a smooth ball.
-
You may also brush oil on your palms to handle the dough easily!
- Roll the dough into a rectangular shape in between 2 layers of parchment paper, using a rolling pin. Remember to roll to a size smaller than your tray. The parchment paper acts as a guide.
- Place the filling in the center, brush edges with egg wash, and seal the edges by lifting up the edge of the parchment.
- Gently close the edges by pressing them tight, do not overstretch the dough!
- Lift the parchment paper with the rolled pastry onto the baking tray.
- Cover the tray with cling wrap. Preheat the oven at 100C for 3 mins, then switch it off.
- Place the tray in the warm oven and let the dough rise for 45-50 minutes.
- Remove the tray, preheat the oven at 170C for 6 mins.
- Brush egg wash on the pastry and bake for 45-55 mins until golden brown.
- Brush hot pastry with butter, cover with a kitchen towel for 30 mins.
- Dust icing sugar on top, slice, and enjoy!
Storing: Wrap the pastry in cling film and place it in an airtight container and refrigerate. Enjoy within a few days for the best freshness. Micro for 20 to 30 secs and serve warm.
Remember to tag me and share your mouth-watering creations! Your photos and experiences are not just culinary delights but an inspiration to me! Feel free to reach out via DM to share your thoughts and experiences with this recipe. Let’s continue making gluten-free baking a joyous and flavorful journey together! Enjoy every bite of this gluten-free Raspberry Pastry Masterpiece!
Embark on a transformative gluten-free journey with our Online Gluten-Free Bread Class! Clicking on the link opens the door to a world of gluten-free and egg-free magic and delightful learning. For our gluten-sensitive readers, this is not just a class; it’s a gateway to:
- Expert Guidance: Access step-by-step video tutorials led by seasoned experts, ensuring a thorough understanding of gluten-free bread making.
- Tailored for You: Learn techniques specifically crafted for those sensitive to gluten, ensuring a safe and enjoyable baking experience.
- Delicious Results: Master the art of creating gluten-free bread that’s not just dietary-compliant but also delicious, so you never have to compromise on taste.
- Community Connection: Join a community of like-minded individuals, sharing experiences and tips, making the learning journey interactive and supportive.
- Fun and Enjoyment: Baking should be fun! Experience the joy of creating mouthwatering gluten-free bread, adding a delightful touch to your culinary repertoire.
Don’t miss out on this opportunity to turn your kitchen into a gluten-free haven – click the link and let the egg-free magic unfold!
Join our Incredible Online (Paid) Gluten-Free Bread Class with Video Tutorials – Where the Egg-Free Magic Awaits! Don’t Miss Out on the Fun!
https://cookeryexpressions.co.in/gluten-free-breads-no-maida-no-atta-eggfree/
✨ Click here to watch the simple, step-by-step video tutorial for the Gluten-Free Grain Harmony Loaf and other amazing gluten-free bakes. Let’s bake up some joy together!
https://www.facebook.com/groups/glutenfreebakingmasterycommunity/