
Gluten-Free Eggless Chocolate Lava Cake: Rich, Gooey and Easy to Make
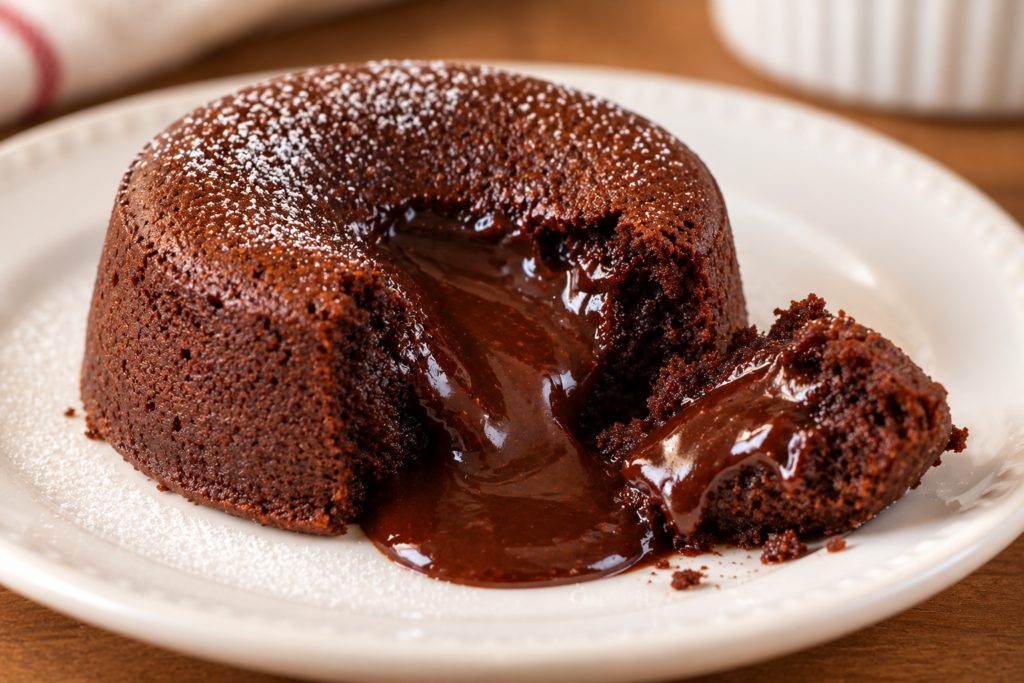
A good gluten-free eggless chocolate lava cake should hold its shape when turned out, yet reveal a warm, flowing chocolate centre when cut.
In this gluten-free eggless chocolate lava cake, brown rice flour and potato starch provide the base structure, while xanthan gum helps support the delicate crumb. A piece of dark chocolate enclosed in the batter creates the molten centre.
This small-batch recipe makes two individual cakes. The key is to get the outer cake set while keeping the chocolate filling molten.
How to Make Gluten-Free Eggless Chocolate Lava Cake
Recipe at a Glance
- Preparation time: 10 minutes
- Baking time: 10–12 minutes
- Total time: Approximately 20–22 minutes, excluding additional resting time
- Yield: 2 small cakes
- Oven: OTG, preheated to 180°C
- Dietary information: Eggless and gluten-free; contains dairy
These timings are based on the tested recipe and setup. Ramekin size, material and oven performance can affect how quickly the cakes bake.
Ingredients
For the cake batter
- 30 g brown rice flour
- 10 g potato starch
- 20 g unsweetened cocoa powder
- 45 g caster sugar
- 2 g baking powder
- 0.5 g xanthan gum
- 60 g milk
- 25 g melted butter
- 2 g vanilla extract
- A pinch of salt
For the chocolate centre
- 30–40 g dark chocolate, divided between the two cakes
You will also need a little butter to grease the ramekins. Icing sugar for dusting is optional.
Before you begin: Weigh the ingredients accurately. Brown rice flour, potato starch and xanthan gum each have a specific role in this formula. Changing the flour blend or ingredient proportions may affect the texture and structure.
Method:
Step 1: Prepare the OTG and ramekins
Preheat your OTG to 180°C. Grease two small, oven-safe ramekins thoroughly, including the base and sides. Pay particular attention to the bottom edge, where the cake is most likely to stick.
Step 2: Mix the dry ingredients
Combine the brown rice flour, potato starch, cocoa powder, caster sugar, baking powder, xanthan gum and salt in a bowl. Mix well, breaking up any cocoa lumps so the ingredients are evenly distributed.
Step 3: Make the batter
Add the milk, melted butter and vanilla extract. Stir until the mixture is evenly combined, with no visible dry flour pockets.
Check the bottom and sides of the bowl as you mix. Dry patches left there can end up in the batter. The finished mixture should be smooth and spoonable. Its exact consistency may vary slightly with the flour and ingredients used.
Step 4: Add and cover the chocolate
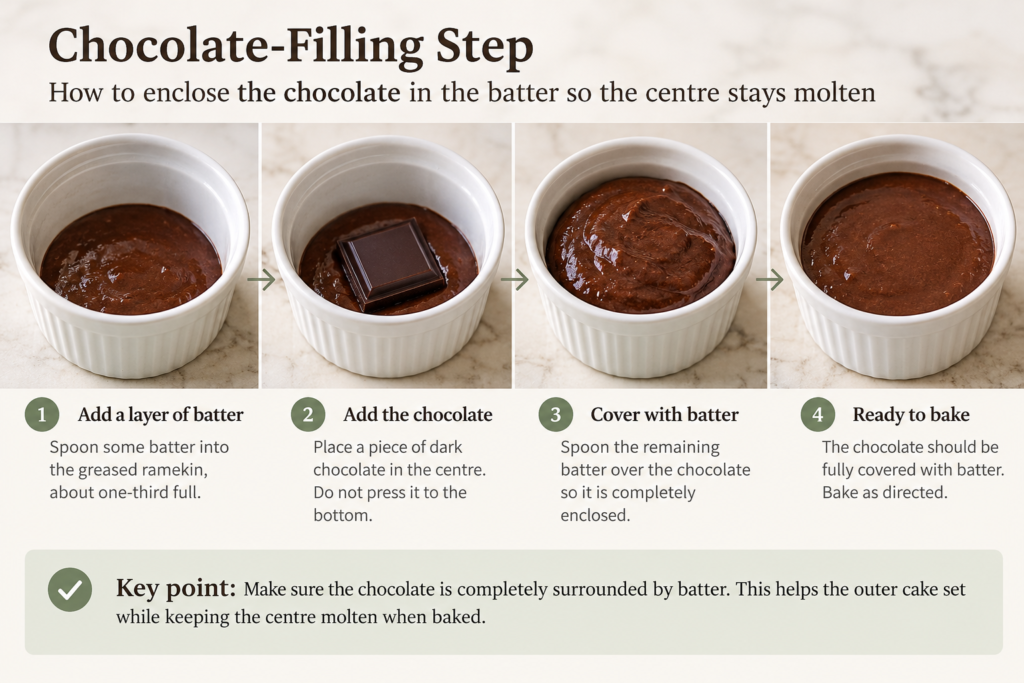
Divide the batter between the two ramekins, filling each about one-third full. Place half the dark chocolate in the centre of each, keeping it away from the base and sides.
Spoon the remaining batter over the chocolate until it is completely enclosed. Check around the edges as well as the top; exposed chocolate may melt out rather than remain as a distinct centre.
Step 5: Bake and check for doneness
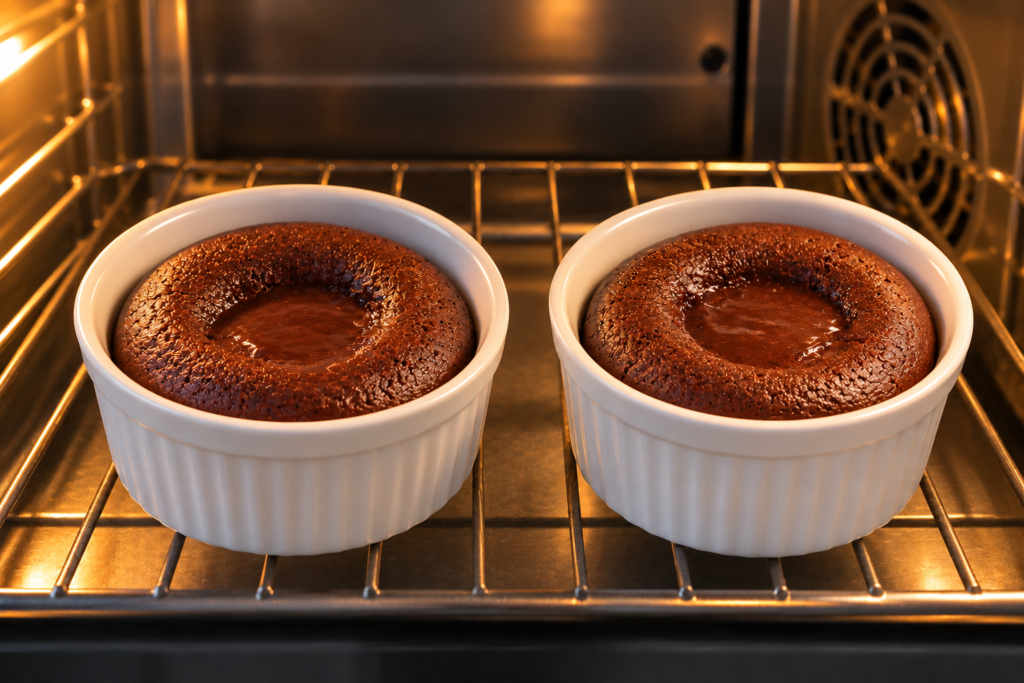
Place the ramekins in the preheated OTG. Bake at 180°C, using 10–12 minutes as an initial timing guide for the specified recipe and ramekins. Begin checking near the lower end of this range, especially if your ramekins are shallow or your OTG runs hot.
Look for edges that appear set and hold their shape, while the centre remains softer. The chocolate filling is meant to melt, so a soft centre alone does not mean the cake is underbaked. If the surrounding cake itself looks loose and unset, it may need more time.
Ramekin dimensions, material and oven performance affect baking time. Use the visual signs alongside the clock, and confirm the timing in your own OTG before treating it as a tested baking time.
Step 6: Rest and unmould
Remove the ramekins carefully and allow the cakes to rest briefly. This gives the outer structure a little time to settle without allowing the filling to cool for too long.
Run a small knife gently around the edge if needed. Place a serving plate over each ramekin, invert carefully and lift the ramekin slowly. If the cake resists, loosen the edges again rather than pulling hard.
Serve immediately while the chocolate centre is still flowing. Dust with icing sugar if you like.
Troubleshooting: Read the Signs Before Changing Anything
With a chocolate lava cake, a soft centre is not automatically a problem. The important question is whether you are seeing melted chocolate or cake batter that has not set. Once you distinguish between the two, it becomes much easier to decide what to check next.
The chocolate centre is not flowing
What you notice: The outer cake holds its shape, but the chocolate centre is thick or firm when you cut into it.
What it suggests: The chocolate may have started to firm up as the cake cooled, or it may not have melted sufficiently.
What to check first: Cut into the cake soon after its brief resting period. If the centre is firm even while the cake is warm, look at the chocolate used before changing the baking time. If the cake has been standing for a while, the filling may simply have cooled.
The centre looks underbaked
What you notice: The centre looks like loose cake batter rather than a pool of melted chocolate. The edges may also look unset.
What it suggests: The cake structure may not have baked sufficiently. A flowing chocolate filling on its own, however, is exactly what you want.
What to check first: Look at the edges as well as the centre. If the edges are still unset and the cake cannot hold its shape, it may need more baking. If the edges are set and only the chocolate in the middle flows, do not extend the baking time simply because the centre is soft.
The crumb is gummy or pasty
What you notice: The sticky, dense or pasty texture extends into the cake itself, rather than being confined to the melted chocolate filling.
What it suggests: The cake structure may not have set properly. In gluten-free baking, the flour and starch balance matters, and changes in ingredient quantities can affect the final texture.
What to check first: Look at a piece of the cake away from the chocolate centre. If that crumb is still pasty, verify the quantities of brown rice flour, potato starch, milk and xanthan gum. If the measurements match the recipe, review the baking conditions before considering any changes to the formula.
The edges are dry or firm
What you notice: The outside is dry or firm, but the chocolate centre remains soft.
What it suggests: The cake may have baked for too long for your ramekins or oven conditions.
What to check first: If the edges are already firm before the end of the usual baking window, start checking earlier next time. Keep the ingredient quantities unchanged while assessing the timing.
The cake sticks to the ramekin
What you notice: The cake resists release, leaving parts of the crust attached to the ramekin.
What it suggests: The problem may be the release process rather than the cake’s internal texture.
What to check first: Check whether the base and sides were greased thoroughly. After a brief rest, loosen the edges gently before turning out the cake. Avoid forcing it free while the structure is still delicate.
The cake breaks or crumbles when unmoulded
What you notice: The cake breaks apart as you turn it out or handle it.
What it suggests: The cake may be too delicate to withstand handling, or its structure may not have set sufficiently. Crumbling alone does not tell you which explanation is correct.
What to check first: Consider when the cake broke. If it was turned out immediately, give it a brief rest next time. If it repeatedly crumbles despite careful handling, check the ingredient measurements and make sure you followed the specified flour blend.
For related guidance, see Why Does My Eggless Cake Crumble?
The whole cake collapses
What you notice: The cake loses its shape after baking or sinks when you turn it out.
What it suggests: The outer structure may not be strong enough to support the cake. Insufficient setting is one possibility, but collapse alone does not establish the cause.
What to check first: Recall whether the edges looked set before you removed the cake from the oven. If they were still soft and unable to hold their shape, review the baking time. If the edges appeared set but the cake still collapsed, check the ingredient measurements and method before changing the formula.
If your cake loses its shape after baking, my guide to why an eggless cake sinks explains other possible causes, including insufficient setting, excess moisture and structural imbalance.
Frequently Asked Questions
Can I prepare the batter ahead of time?
For the most predictable result, mix the batter shortly before baking. Chilling filled ramekins changes the batter temperature and may affect baking time. Prepare-ahead timing has not been validated for this formula.
Can I make this recipe vegan?
Not as written. This recipe contains milk and butter. Plant-based alternatives have not been tested in this formula, so the same baking time and texture cannot be guaranteed.
Where Can I Find More Gluten-Free Recipes?
If you enjoy rich chocolate desserts, try my Fudgy, Gluten-Free Brownies for another indulgent chocolate treat.
For something different, my Gluten-Free, Egg-Free Blueberry Orange Scones are a lovely option for tea-time baking, with a fruity flavour and tender texture.
Looking for more ideas? Explore my Gluten-Free Recipes collection for more recipes to try at home.
A Final Note
With lava cakes, the important distinction is between the melted chocolate filling and the structure of the cake around it. Look at the specific symptom before deciding what to change. Often, checking one relevant detail is more useful than adjusting several ingredients at once.
Sharmila Sengupta | Baking Expert & Educator | 25+ Years of Baking Experience